目录
您是否想知道可以使用 WordPress 函数文件做什么?
所有 WordPress 主题都带有一个 functions.php 文件。此文件充当插件,允许主题开发人员和普通用户轻松地在 WordPress 中添加自定义代码。
在本文中,我们将向您展示一些适用于 WordPress 函数文件的有用技巧。
functions.php 文件是一个 WordPress 主题文件,它附带所有免费和高级 WordPress 主题。
它充当插件,并允许主题开发人员定义主题功能。用户还可以使用它在 WordPress 中添加他们的自定义代码片段。
但是,将自定义代码保留在模板的函数文件中并不是保存自定义设置的最佳方式。如果您更新主题,则 functions.php 文件将被覆盖,并且您将丢失自定义代码片段。
相反,我们建议每个人都使用 WPCode,这是一个免费插件,可让您将代码片段插入您的 WordPress 网站,而无需编辑任何主题、插件或核心 WordPress 文件。
最好的部分是您的所有自定义代码都单独保存,因此任何 WordPress 更新都不会删除它们。
在我们开始之前,让我们看看如何将本文中的代码片段添加到您的 WordPress 函数文件中。
1. 使用 WPCode 向 Functions 文件添加自定义代码(推荐)
首先,您需要安装并激活 WPCode 插件。
激活后,转到 Code Snippets » + Add Snippet 页面。您将看到 WPCode 的代码库,其中已经添加了许多有用的自定义代码片段。
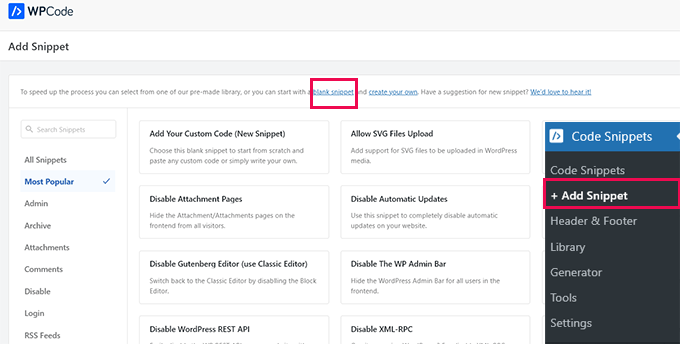
如果您的代码片段与库中的代码片段执行相同的操作,则可以尝试已在此处添加的代码片段。
或者,单击“空白代码段”链接以继续添加您的自定义代码段。
在下一个屏幕上,为您的自定义代码提供标题。这可以是可以帮助您识别此代码片段的作用的任何内容。
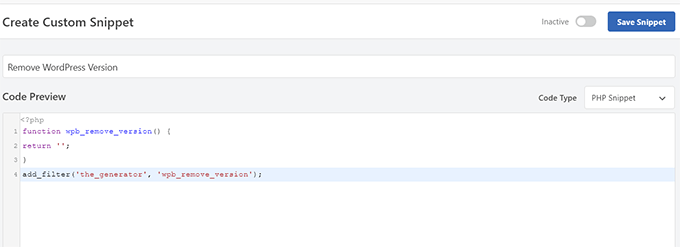
接下来,您需要选择 'Code Type'。如果要添加在 functions.php 文件中有效的代码,则必须选择“PHP Snippet”。
在此下方,您需要将自定义代码复制并粘贴到 'Code Preview' 框中。
最后,您需要将代码段设置为 'Active' 并单击 'Save Snippet' 按钮。

您保存的代码段现在将像您将其添加到 functions.php 文件时一样运行。
您可以重复此过程以在需要时添加更多代码段。您也可以停用代码段而不将其删除。
2. 将自定义代码直接添加到 Functions 文件中
WPCode 方法总是比将代码添加到主题的函数文件更好。
但是,一些用户可能正在为客户的自定义 WordPress 主题编写代码,或者只是喜欢将代码添加到 functions.php 文件中。
在这种情况下,以下是将代码添加到 WordPress 主题的 functions.php 文件的方法。
首先,使用 FTP 客户端连接到您的 WordPress 网站。连接后,导航到 /wp-content/themes/your-wordpress-theme/ 文件夹。
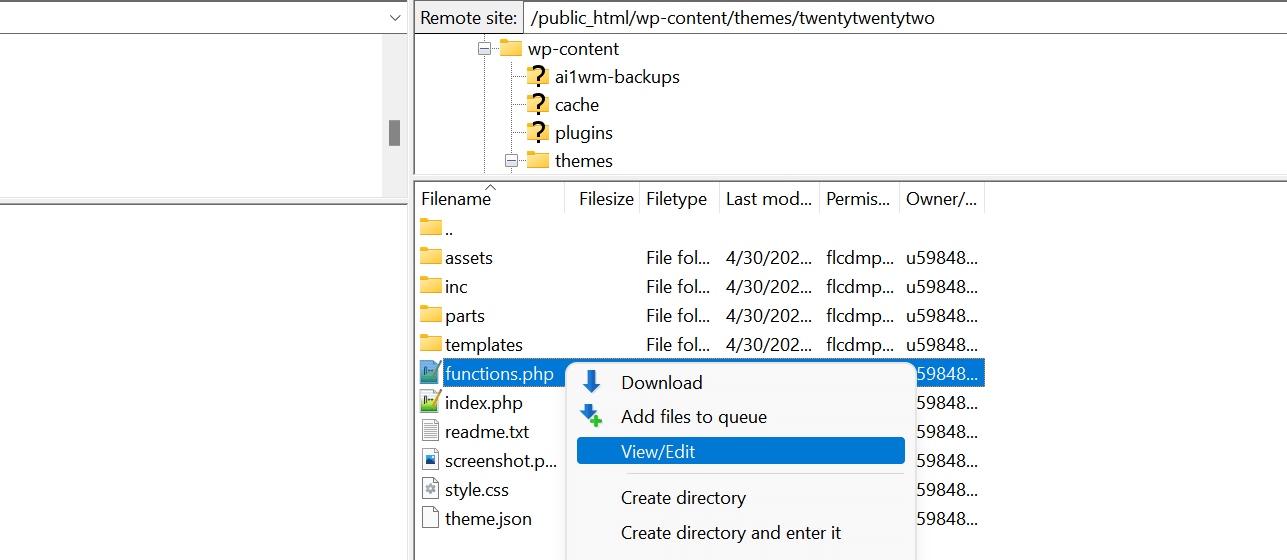
在那里你会找到 functions.php 文件。只需右键单击并选择编辑或将文件下载到您的计算机进行编辑。
您可以使用任何纯文本编辑器(如记事本或 TextEdit)对其进行编辑。
然后,向下滚动到 functions.php 文件的底部,并将您的代码片段粘贴到该处。您可以保存更改并将更新的 functions.php 文件上传到您的主题文件夹。
您现在可以访问您的 WordPress 网站以查看您的自定义代码的实际运行情况。
现在,让我们看一下 WordPress 函数文件的 46 个不同的有用技巧。
您应该始终使用最新版本的 WordPress。但是,您可能希望从您的网站中删除 WordPress 版本号。
只需将此代码片段添加到您的函数文件中或作为新的 WPCode 代码片段:
function wpb_remove_version() {
return '';
}
add_filter('the_generator', 'wpb_remove_version');
想要为您的 WordPress 管理区域贴上白标吗?添加自定义控制面板 logo 是该过程的第一步。
首先,您需要将自定义 logo 作为custom-logo.png上传到模板的 images 文件夹。您的自定义 logo 应采用 1:1 的比例(方形图像),像素为 16×16。
之后,您可以将此代码添加到主题的函数文件中或作为新的 WPCode 代码段:
function wpb_custom_logo() {
echo '
<style type="text/css">
#wpadminbar #wp-admin-bar-wp-logo > .ab-item .ab-icon:before {
background-image: url(' . get_bloginfo('stylesheet_directory') . '/images/custom-logo.png) !important;
background-position: 0 0;
color:rgba(0, 0, 0, 0);
}
#wpadminbar #wp-admin-bar-wp-logo.hover > .ab-item .ab-icon {
background-position: 0 0;
}
</style>
';
}
//hook into the administrative header output
add_action('wp_before_admin_bar_render', 'wpb_custom_logo');
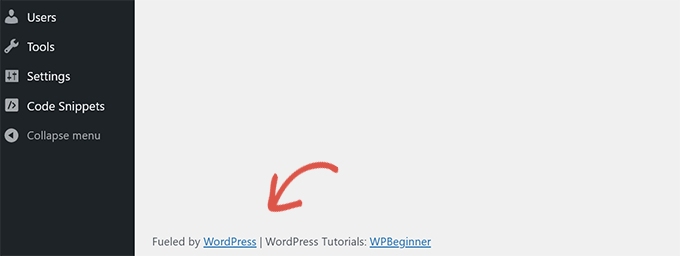
WordPress 管理区域中的页脚显示消息“感谢您使用 WordPress 进行创建”。您可以通过添加以下代码将其更改为您想要的任何内容:
function remove_footer_admin () {

echo 'Fueled by <a href="http://www.wordpress.org" target="_blank">WordPress</a> | WordPress Tutorials: <a href="https://www.wpbeginner.com" target="_blank">WPBeginner</a></p>';

}

add_filter('admin_footer_text', 'remove_footer_admin');
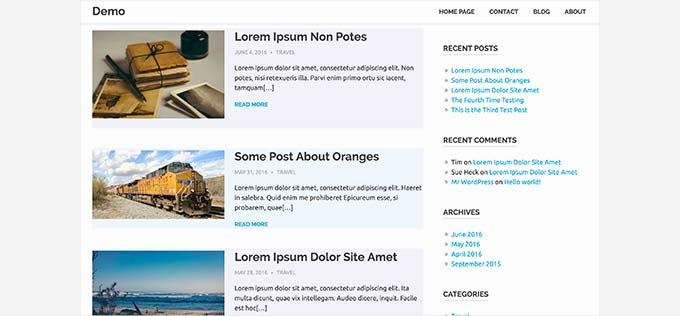
请随意更改要添加的文本和链接。这是它在我们的测试网站上的样子。
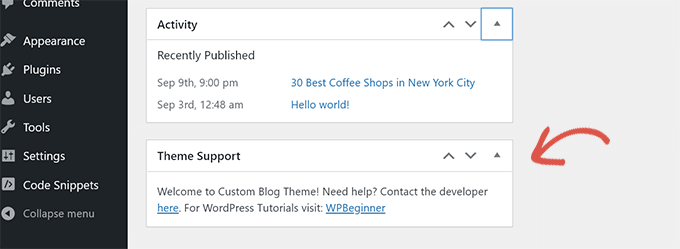
您可能已经看到许多插件和主题添加到 WordPress 仪表板的小部件。您可以通过粘贴以下代码自行添加一个:
add_action('wp_dashboard_setup', 'my_custom_dashboard_widgets');

function my_custom_dashboard_widgets() {
global $wp_meta_boxes;

wp_add_dashboard_widget('custom_help_widget', 'Theme Support', 'custom_dashboard_help');
}

function custom_dashboard_help() {
echo '<p>Welcome to Custom Blog Theme! Need help? Contact the developer <a href="mailto:yourusername@gmail.com">here</a>. For WordPress Tutorials visit: <a href="https://www.wpbeginner.com" target="_blank">WPBeginner</a></p>';
}
这是它的样子:
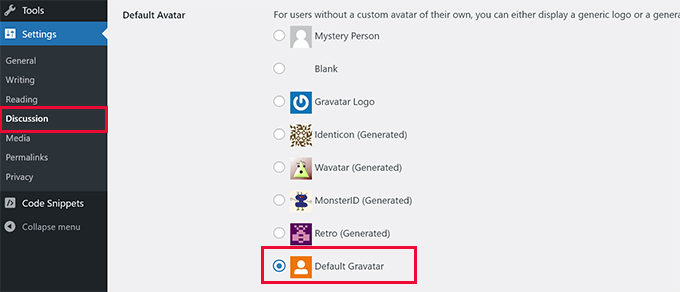
你在博客上见过默认的神秘人头像吗?您可以轻松地将其替换为您自己的品牌自定义头像。
只需上传要用作默认头像的图像,并将此代码添加到函数文件或 WPCode 插件中:
function wpb_custom_default_gravatar( $avatar_defaults ) {
    $myavatar = 'https://example.com/wp-content/uploads/2022/10/dummygravatar.png';
    $avatar_defaults[$myavatar] = 'Default Gravatar';
    return $avatar_defaults;
}
add_filter( 'avatar_defaults', 'wpb_custom_default_gravatar' );
现在,您可以前往 Settings » Discussion 页面并选择您的默认头像。
您可以通过编辑模板中的页脚模板来简单地添加版权日期。但是,它不会显示您的网站何时开始,也不会在下一年自动更改。
此代码可以在 WordPress 页脚中添加动态版权日期:
function wpb_copyright() {
global $wpdb;
$copyright_dates = $wpdb->get_results("
SELECT
YEAR(min(post_date_gmt)) AS firstdate,
YEAR(max(post_date_gmt)) AS lastdate
FROM
$wpdb->posts
WHERE
post_status = 'publish'
");
$output = '';
if($copyright_dates) {
$copyright = "© " . $copyright_dates[0]->firstdate;
if($copyright_dates[0]->firstdate != $copyright_dates[0]->lastdate) {
$copyright .= '-' . $copyright_dates[0]->lastdate;
}
$output = $copyright;
}
return $output;
}
添加此函数后,您需要打开 footer.php 文件,并在要显示动态版权日期的位置添加以下代码:
<?php echo wpb_copyright(); ?>
您想在每次访问和页面重新加载时随机更改 WordPress 博客上的背景颜色吗?以下是轻松执行此操作的方法。
首先,将此代码添加到主题的函数文件或 WPCode 插件中:
function wpb_bg() {
$rand = array('0', '1', '2', '3', '4', '5', '6', '7', '8', '9', 'a', 'b', 'c', 'd', 'e', 'f');
$color ='#'.$rand[rand(0,15)].$rand[rand(0,15)].$rand[rand(0,15)].
$rand[rand(0,15)].$rand[rand(0,15)].$rand[rand(0,15)];

echo $color;
}
接下来,您需要在模板中编辑 header.php 文件。找到标签并将其替换为以下行:<body>
<body <?php body_class(); ?> style="background-color:<?php wpb_bg();?>">
您现在可以保存更改并访问您的网站以查看此代码的运行情况。
如果您的 WordPress 登录页面不断刷新或您无法访问管理区域,那么您需要更新 WordPress URL。
一种方法是使用 wp-config.php 文件。但是,如果您这样做,则无法在设置页面上设置正确的地址。WordPress URL 和 Site URL 字段将被锁定且不可编辑。
相反,只需将此代码添加到您的 functions 文件中即可解决此问题:
update_option( 'siteurl', 'https://example.com' );
update_option( 'home', 'https://example.com' );
不要忘记将 example.com 替换为您的域名。
登录后,您可以转到 WordPress 管理区域中的“设置”页面并设置 URL。
之后,您应该删除您添加到函数文件或 WPCode 中的代码。否则,每当访问您的网站时,它都会不断更新这些 URL。
当您上传图像时,WordPress 会自动生成多个图像大小。您还可以创建其他图像大小以用于您的主题。
只需将此代码添加到主题的函数文件或作为 WPCode 代码片段即可:
add_image_size( 'sidebar-thumb', 120, 120, true ); // Hard Crop Mode
add_image_size( 'homepage-thumb', 220, 180 ); // Soft Crop Mode
add_image_size( 'singlepost-thumb', 590, 9999 ); // Unlimited Height Mode
此代码创建三个不同大小的新图像大小。请随意调整代码以满足您的要求。
然后,您可以使用以下代码在模板中的任何位置显示图像大小:
<?php the_post_thumbnail( 'homepage-thumb' ); ?>
WordPress 允许主题开发人员定义导航菜单,然后显示它们。
您可以将此代码添加到主题的函数文件中,或作为新的 WPCode 代码段,以在主题中定义新的菜单位置:
function wpb_custom_new_menu() {
  register_nav_menu('my-custom-menu',__( 'My Custom Menu' ));
}
add_action( 'init', 'wpb_custom_new_menu' );
您现在可以转到 WordPress 仪表板中的外观 » 菜单,并将“我的自定义菜单”视为主题位置选项。
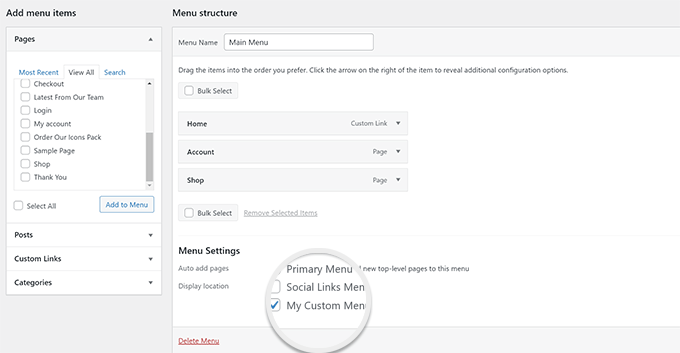
注意: 此代码也适用于具有完整站点编辑功能的块主题。添加它将启用 Appearance 下的 Menus 屏幕。
现在,您需要将此代码添加到要显示导航菜单的主题中:
<?php
wp_nav_menu( array(
    'theme_location' => 'my-custom-menu',
    'container_class' => 'custom-menu-class' ) );
?>
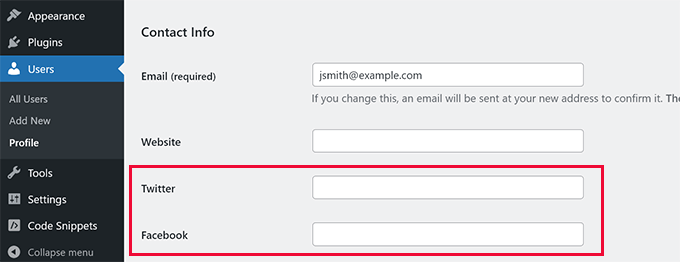
您想在 WordPress 中的作者配置文件中添加额外的字段吗?您可以通过将此代码添加到函数文件或作为新的 WPCode 代码段来轻松实现此目的:
function wpb_new_contactmethods( $contactmethods ) {
// Add Twitter
$contactmethods['twitter'] = 'Twitter';
//add Facebook
$contactmethods['facebook'] = 'Facebook';

return $contactmethods;
}
add_filter('user_contactmethods','wpb_new_contactmethods',10,1);
此代码会将 Twitter 和 Facebook 字段添加到 WordPress 中的用户配置文件中。
现在,您可以在创作模板中显示这些字段,如下所示:
<?php echo get_the_author_meta('twitter') ?>
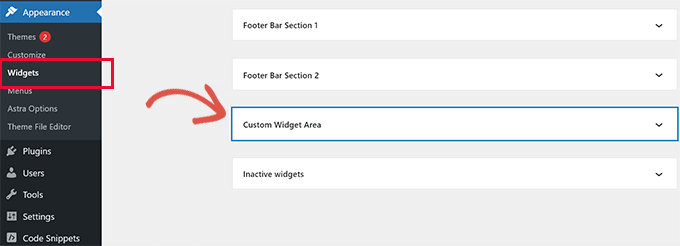
这是最常用的代码片段之一,许多开发人员已经知道向 WordPress 主题添加小部件就绪区域或侧边栏。但对于那些不知道的人来说,它应该出现在这个名单上。
您可以将以下代码粘贴到 functions.php 文件中,或粘贴为新的 WPCode 代码段:
// Register Sidebars
function custom_sidebars() {

    $args = array(
        'id'            => 'custom_sidebar',
        'name'          => __( 'Custom Widget Area', 'text_domain' ),
        'description'   => __( 'A custom widget area', 'text_domain' ),
        'before_title'  => '<h3 class="widget-title">',
        'after_title'   => '</h3>',
        'before_widget' => '<aside id="%1$s" class="widget %2$s">',
        'after_widget'  => '</aside>',
    );
    register_sidebar( $args );

}
add_action( 'widgets_init', 'custom_sidebars' );
注意: 此代码也适用于具有完整站点编辑功能的块主题。添加它将启用 Appearance 下的 Widgets 屏幕。
您现在可以访问Appearance » Widgets页面,并查看新的自定义小部件区域。
要在网站上显示此侧边栏或小组件就绪区域,您需要在要显示它的模板中添加以下代码:
<?php if ( !function_exists('dynamic_sidebar') || !dynamic_sidebar('custom_sidebar') ) : ?>
<!–Default sidebar info goes here–>
<?php endif; ?>
您是否见过博客在每篇文章下方的 RSS 提要中添加他们的广告?您可以通过一个简单的功能轻松完成此操作。只需粘贴以下代码:
function wpbeginner_postrss($content) {
if(is_feed()){
$content = 'This post was written by Syed Balkhi '.$content.'Check out WPBeginner';
}
return $content;
}
add_filter('the_excerpt_rss', 'wpbeginner_postrss');
add_filter('the_content', 'wpbeginner_postrss');
文章缩略图或特色图片通常仅显示在您的网站设计中。您可以使用以下代码轻松地将该功能扩展到您的 RSS 源:
function rss_post_thumbnail($content) {
global $post;
if(has_post_thumbnail($post->ID)) {
$content = '<p>' . get_the_post_thumbnail($post->ID) .
'</p>' . get_the_content();
}
return $content;
}
add_filter('the_excerpt_rss', 'rss_post_thumbnail');
add_filter('the_content_feed', 'rss_post_thumbnail');
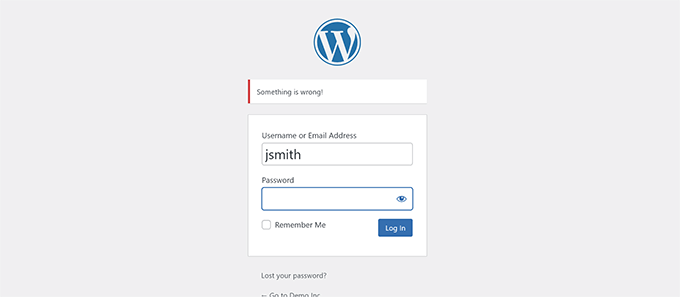
黑客可以使用登录错误来猜测他们是否输入了错误的用户名或密码。通过在 WordPress 中隐藏登录错误,您可以使您的登录区域和 WordPress 网站更加安全。
只需将以下代码添加到主题的函数文件或作为新的 WPCode 代码段即可:
function no_wordpress_errors(){
  return 'Something is wrong!';
}
add_filter( 'login_errors', 'no_wordpress_errors' );
现在,当用户输入不正确的用户名或密码时,将看到一条通用消息。
WordPress 允许用户使用他们的用户名或电子邮件地址登录。您可以通过将此代码添加到您的函数文件或作为新的 WPCode 代码段来轻松禁用 WordPress 中的电子邮件登录:
remove_filter( 'authenticate', 'wp_authenticate_email_password', 20 );
如果您想禁用 WordPress 网站的搜索功能,只需将此代码添加到您的函数文件或新的 WPCode 代码段中:
function wpb_filter_query( $query, $error = true ) {
if ( is_search() ) {
$query->is_search = false;
$query->query_vars[s] = false;
$query->query[s] = false;
if ( $error == true )
$query->is_404 = true;
}}
此代码只是通过修改搜索查询并返回 404 错误而不是搜索结果来禁用搜索查询。
有时,您发布的文章可能会出现语法错误或拼写错误。
该错误会生效并分发给您的 RSS 源订阅者。如果您的 WordPress 博客上有电子邮件订阅,那么这些订阅者也会收到通知。
只需将此代码添加到主题的函数文件中或作为新的 WPCode 代码段,即可延迟 RSS 提要中的帖子:
function publish_later_on_feed($where) {

    global $wpdb;

    if ( is_feed() ) {
        // timestamp in WP-format
        $now = gmdate('Y-m-d H:i:s');

        // value for wait; + device
        $wait = '10'; // integer

        // http://dev.mysql.com/doc/refman/5.0/en/date-and-time-functions.html#function_timestampdiff
        $device = 'MINUTE'; //MINUTE, HOUR, DAY, WEEK, MONTH, YEAR

        // add SQL-sytax to default $where
        $where .= " AND TIMESTAMPDIFF($device, $wpdb->posts.post_date_gmt, '$now') > $wait ";
    }
    return $where;
}

add_filter('posts_where', 'publish_later_on_feed');
在此代码中,我们使用 10 分钟作为$wait或延迟时间。请随意将其更改为您想要的任何分钟数。
是否要更改帖子中摘录后的文本?只需将此代码添加到主题的函数文件中或作为新的 WPCode 代码段即可:
function modify_read_more_link() {
    return '<a class="more-link" href="' . get_permalink() . '">Your Read More Link Text</a>';
}
add_filter( 'the_content_more_link', 'modify_read_more_link' );
并非所有网站都需要 RSS 源。如果您想在 WordPress 网站上禁用 RSS 源,请将此代码添加到主题的函数文件或作为新的 WPCode 代码段:
function new_excerpt_more($more) {
 global $post;
 return '<a class="moretag"
 href="'. get_permalink($post->ID) . '">Your Read More Link Text</a>';
}
add_filter('excerpt_more', 'new_excerpt_more');
WordPress 将摘录长度限制为 55 个单词。你可以将此代码添加到你的函数文件中,或者如果你需要更改它,可以将其作为新的 WPCode 代码段添加:
function new_excerpt_length($length) {
return 100;
}
add_filter('excerpt_length', 'new_excerpt_length');
只需将 100 更改为您希望在摘录中显示的字数即可。
如果您忘记了 WordPress 密码和电子邮件,那么您可以通过使用 FTP 客户端将此代码添加到主题的函数文件中来添加管理员用户:
function wpb_admin_account(){
$user = 'Username';
$pass = 'Password';
$email = 'email@domain.com';
if ( !username_exists( $user )  && !email_exists( $email ) ) {
$user_id = wp_create_user( $user, $pass, $email );
$user = new WP_User( $user_id );
$user->set_role( 'administrator' );
} }
add_action('init','wpb_admin_account');
不要忘记填写用户名、密码和电子邮件字段。
重要:登录 WordPress 网站后,不要忘记从函数文件中删除代码。
如果您运行多语言网站,则 WordPress 会在登录页面上显示语言选择器。您可以通过将以下代码添加到您的 functions.php 文件或作为新的 WPCode 代码段来轻松禁用它:
add_filter( 'login_display_language_dropdown', '__return_false' );
您想显示 WordPress 网站上的注册用户总数吗?只需将此代码添加到主题的函数文件中或作为新的 WPCode 代码段即可:
function wpb_user_count() {
$usercount = count_users();
$result = $usercount['total_users'];
return $result;
}
// Creating a shortcode to display user count
add_shortcode('user_count', 'wpb_user_count');
此代码创建一个短代码,允许您显示您网站上的注册用户总数。
现在您只需将短代码添加到要显示用户总数的帖子或页面中。[user_count]
您想从 WordPress RSS 提要中排除特定类别吗?您可以将此代码添加到主题的函数文件中,或作为新的 WPCode 代码段添加:
function exclude_category($query) {
    if ( $query->is_feed ) {
        $query->set('cat', '-5, -2, -3');
    }
return $query;
}
add_filter('pre_get_posts', 'exclude_category');
默认情况下,WordPress 会将 URL 转换为评论中的可点击链接。
您可以通过将以下代码添加到函数文件或作为新的 WPCode 代码段来停止此操作:
remove_filter( 'comment_text', 'make_clickable', 9 );
您可能已经看到 WordPress 主题对 WordPress 评论使用奇数或偶数类。它可以帮助用户直观地了解一条评论的结束位置和下一条评论的开始位置。
您可以对 WordPress 帖子使用相同的技术。它看起来美观,可以帮助用户快速浏览包含大量内容的页面。
只需将此代码添加到主题的函数文件中即可:
function oddeven_post_class ( $classes ) {
   global $current_class;
   $classes[] = $current_class;
   $current_class = ($current_class == 'odd') ? 'even' : 'odd';
   return $classes;
}
add_filter ( 'post_class' , 'oddeven_post_class' );
global $current_class;
$current_class = 'odd';
此代码只是向 WordPress 帖子添加一个奇数或偶数类。您现在可以添加自定义 CSS 以不同方式设置它们的样式。
以下是一些可帮助您入门的示例代码:
.even {
background:#f0f8ff;
}
.odd {
 background:#f4f4fb;
}
最终结果将如下所示:
默认情况下,WordPress 允许您上传有限数量的最常用文件类型。但是,您可以扩展它以允许其他文件类型。
只需将此代码添加到主题的函数文件中即可:
function my_myme_types($mime_types){
    $mime_types['svg'] = 'image/svg+xml'; //Adding svg extension
    $mime_types['psd'] = 'image/vnd.adobe.photoshop'; //Adding photoshop files
    return $mime_types;
}
add_filter('upload_mimes', 'my_myme_types', 1, 1);
此代码允许您将 SVG 和 PSD 文件上传到 WordPress。
您需要找到要允许的文件类型的 MIME 类型,然后在代码中使用它们。
默认情况下,WordPress 使用不存在的电子邮件地址 (wordpress@yourdomain.com) 发送外发电子邮件。
此电子邮件地址可能会被电子邮件服务提供商标记为垃圾邮件。
如果您想快速将其更改为真实的电子邮件地址,则可以在函数文件中添加以下代码或作为新的 WPCode 代码段:
// Function to change email address
function wpb_sender_email( $original_email_address ) {
    return 'tim.smith@example.com';
}

// Function to change sender name
function wpb_sender_name( $original_email_from ) {
    return 'Tim Smith';
}

// Hooking up our functions to WordPress filters
add_filter( 'wp_mail_from', 'wpb_sender_email' );
add_filter( 'wp_mail_from_name', 'wpb_sender_name' );
不要忘记将电子邮件地址和姓名替换为您自己的信息。
这种方法的问题在于 WordPress 仍在使用 mail() 函数发送电子邮件,而此类电子邮件最有可能以垃圾邮件告终。
如果您运行一个多作者网站,并希望在文章末尾展示作者简介,则可以尝试此方法。
首先将此代码添加到您的函数文件或作为新的 WPCode 代码段:
function wpb_author_info_box( $content ) {

global $post;

// Detect if it is a single post with a post author
if ( is_single() && isset( $post->post_author ) ) {

// Get author's display name
$display_name = get_the_author_meta( 'display_name', $post->post_author );

// If display name is not available then use nickname as display name
if ( empty( $display_name ) )
$display_name = get_the_author_meta( 'nickname', $post->post_author );

// Get author's biographical information or description
$user_description = get_the_author_meta( 'user_description', $post->post_author );

// Get author's website URL
$user_website = get_the_author_meta('url', $post->post_author);

// Get link to the author archive page
$user_posts = get_author_posts_url( get_the_author_meta( 'ID' , $post->post_author));

// Get User Gravatar
$user_gravatar =  get_avatar( get_the_author_meta( 'ID' , $post->post_author) , 90 );

if ( ! empty( $display_name ) )

$author_details = '<p class="author_name">About ' . $display_name . '</p>';

if ( ! empty( $user_description ) )
// Author avatar and bio will be displayed if author has filled in description.

$author_details .= '<p class="author_details">' . $user_gravatar . nl2br( $user_description ). '</p>';

$author_details .= '<p class="author_links"><a href="'. $user_posts .'">View all posts by ' . $display_name . '</a>';

// Check if author has a website in their profile
if ( ! empty( $user_website ) ) {

// Display author website link
$author_details .= ' | <a href="' . $user_website .'" target="_blank" rel="nofollow noopener">Website</a></p>';

} else {
// if there is no author website then just close the paragraph
$author_details .= '</p>';
}

// Pass all this info to post content
$content = $content . '<footer class="author_bio_section" >' . $author_details . '</footer>';
}
return $content;
}

// Add our function to the post content filter
add_action( 'the_content', 'wpb_author_info_box' );

// Allow HTML in author bio section
remove_filter('pre_user_description', 'wp_filter_kses');
接下来,您需要添加一些自定义 CSS 以使其看起来更好。
您可以使用此示例 CSS 作为起点:
.author_bio_section{
background: none repeat scroll 0 0 #F5F5F5;
padding: 15px;
border: 1px solid #ccc;
}

.author_name{
font-size:16px;
font-weight: bold;
}

.author_details img {
border: 1px solid #D8D8D8;
border-radius: 50%;
float: left;
margin: 0 10px 10px 0;
}
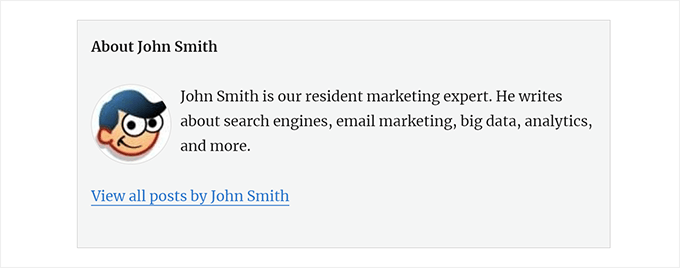
这是您的作者框的样子:
XML-RPC 是一种允许第三方应用程序与您的 WordPress 网站远程通信的方法。这可能会导致安全问题,并可能被黑客利用。
要在 WordPress 中关闭 XML-RPC,请将以下代码添加到您的函数文件中或作为新的 WPCode 代码段:
add_filter('xmlrpc_enabled', '__return_false');
如果您的 WordPress 主题没有自动将特色图片链接到完整文章,那么您可以尝试此方法。
只需将此代码添加到主题的函数文件中或作为新的 WPCode 代码段即可:
function wpb_autolink_featured_images( $html, $post_id, $post_image_id ) {

If (! is_singular()) {

$html = '<a href="' . get_permalink( $post_id ) . '" title="' . esc_attr( get_the_title( $post_id ) ) . '">' . $html . '</a>';
return $html;

} else {

return $html;

}

}
add_filter( 'post_thumbnail_html', 'wpb_autolink_featured_images', 10, 3 );
WordPress 使用现代且直观的编辑器来编写内容和编辑您的网站。此编辑器将块用于常用的内容和布局元素,这就是它被称为块编辑器的原因。
但是,在某些使用案例中,您可能需要使用旧版 Classic Editor。
禁用块编辑器的最简单方法是使用 Classic Editor 插件。但是,如果您不想使用单独的插件,只需将以下代码添加到您的函数文件中或作为新的 WPCode 代码段:
add_filter('gutenberg_can_edit_post', '__return_false', 5);
add_filter('use_block_editor_for_post', '__return_false', 5);
WordPress 在 WordPress 5.8 中从经典小部件切换到块小部件。新的块 Widget 更易于使用,并且比经典 Widget 为您提供更多的设计控制。
但是,一些用户可能仍希望使用经典 Widget。在这种情况下,您可以在主题的 functions 文件中使用以下代码,或将其用作新的 WPCode 代码段:
add_filter( 'use_widgets_block_editor', '__return_false' );
当访问者查看您的 WordPress 博客上的帖子或页面时,您的 WordPress 主题将显示帖子的发布日期。这对于大多数博客和静态网站来说都很好。
但是,定期更新旧文章的网站也使用 WordPress。在这些出版物中,显示文章上次修改的日期和时间是必不可少的。
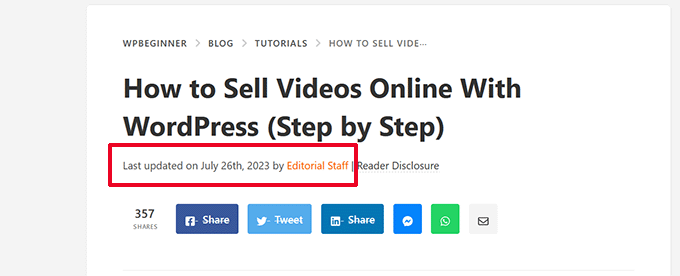
您可以在主题的函数文件中使用以下代码显示上次更新日期,或作为新的 WPCode 代码段显示:
$u_time          = get_the_time( 'U' );
$u_modified_time = get_the_modified_time( 'U' );
// Only display modified date if 24hrs have passed since the post was published.
if ( $u_modified_time >= $u_time + 86400 ) {

    $updated_date = get_the_modified_time( 'F jS, Y' );
    $updated_time = get_the_modified_time( 'h:i a' );

    $updated = '<p class="last-updated">';

    $updated .= sprintf(
    // Translators: Placeholders get replaced with the date and time when the post was modified.
        esc_html__( 'Last updated on %1$s at %2$s' ),
        $updated_date,
        $updated_time
    );
    $updated .= '</p>';

    echo wp_kses_post( $updated );
}
如果您运行多作者网站,则作者可以上传文件名为大写和小写的图像。
添加以下代码可确保所有文件名均为小写:
add_filter( 'sanitize_file_name', 'mb_strtolower' );
默认情况下,当登录用户查看您的网站时,WordPress 会在顶部显示管理栏。
您可以为除站点管理员以外的所有用户禁用管理员栏。只需将以下代码添加到您的函数文件中或作为新的 WPCode 代码段:
/* Disable WordPress Admin Bar for all users */
add_filter( 'show_admin_bar', '__return_false' );
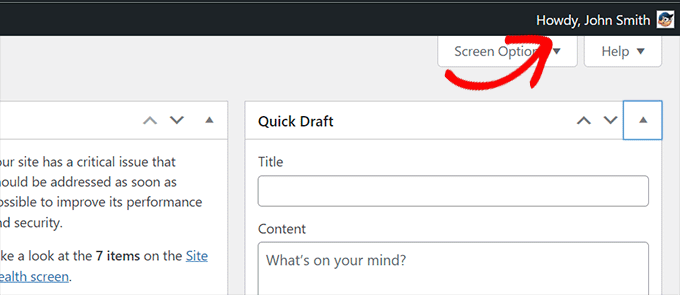
WordPress 在 WordPress 仪表板中显示“Howdy Admin”问候语。“Admin” 将替换为已登录用户的名称。
您可以通过在 functions 文件中添加以下代码或作为新的 WPCode 代码段来将默认问候语更改为您自己的问候语:
function wpcode_snippet_replace_howdy( $wp_admin_bar ) {

    // Edit the line below to set what you want the admin bar to display intead of "Howdy,".
    $new_howdy = 'Welcome,';

    $my_account = $wp_admin_bar->get_node( 'my-account' );
    $wp_admin_bar->add_node(
        array(
            'id'    => 'my-account',
            'title' => str_replace( 'Howdy,', $new_howdy, $my_account->title ),
        )
    );
}

add_filter( 'admin_bar_menu', 'wpcode_snippet_replace_howdy', 25 );
块编辑器允许您切换到 Code Editor。如果您需要手动添加一些 HTML 代码,这将非常方便。
但是,您可能希望将此功能仅限于站点管理员。
您可以将以下代码添加到您的函数文件中或作为 WPCode 代码段来实现此目的:
add_filter( 'block_editor_settings_all', function ( $settings ) {

    $settings['codeEditingEnabled'] = current_user_can( 'manage_options' );

    return $settings;
} );
WordPress 带有一个内置编辑器,您可以在其中编辑插件文件。您可以通过转到Plugins » Plugin File Editor页面来查看它。
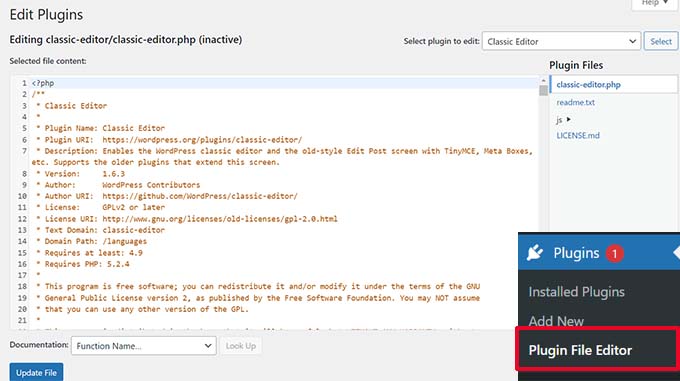
同样,WordPress 还包括一个用于经典主题的文件编辑器,位于 外观 » 主题文件编辑器。
注意:如果您使用块主题,则主题文件编辑器不可见。
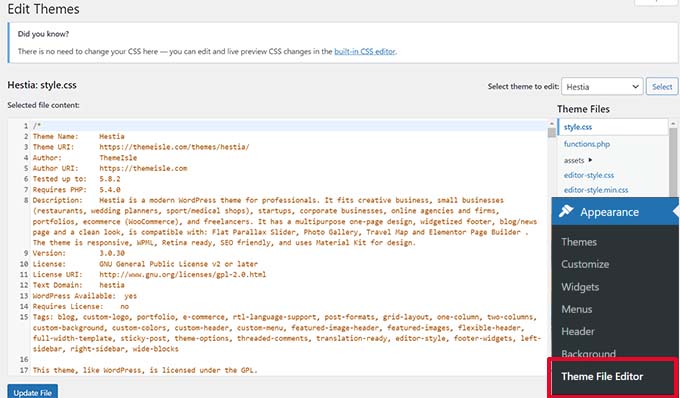
我们不建议使用这些编辑器来更改您的主题或插件。代码中的一个小错误可能会使所有用户都无法访问您的网站。
要禁用插件/主题编辑器,请将以下代码添加到您的函数文件或作为 WPCode 代码段添加:
// Disable the Plugin and Theme Editor
if ( ! defined( 'DISALLOW_FILE_EDIT' ) ) {
    define( 'DISALLOW_FILE_EDIT', true );
}
默认情况下,当新用户加入您的 WordPress 网站时,WordPress 会发送电子邮件通知。
如果您运行 WordPress 会员网站或要求用户注册,那么每次用户加入您的网站时,您都会收到通知。
要关闭这些通知,您可以将以下内容添加到您的函数文件或作为新的 WPCode 代码段添加:
function wpcode_send_new_user_notifications( $user_id, $notify = 'user' ) {
    if ( empty( $notify ) || 'admin' === $notify ) {
        return;
    } elseif ( 'both' === $notify ) {
        // Send new users the email but not the admin.
        $notify = 'user';
    }
    wp_send_new_user_notifications( $user_id, $notify );
}

add_action(
    'init',
    function () {
        // Disable default email notifications.
        remove_action( 'register_new_user', 'wp_send_new_user_notifications' );
        remove_action( 'edit_user_created_user', 'wp_send_new_user_notifications' );

        // Replace with custom function that only sends to user.
        add_action( 'register_new_user', 'wpcode_send_new_user_notifications' );
        add_action( 'edit_user_created_user', 'wpcode_send_new_user_notifications', 10, 2 );
    }
);
有时,WordPress 可能会自动安装安全和维护更新或更新具有严重漏洞的插件。
每次更新后,它都会发送自动更新电子邮件通知。如果您管理多个 WordPress 网站,那么您可能会收到几封这样的电子邮件。
您可以将此代码添加到您的函数文件中或作为新的 WPCode 代码段来关闭这些电子邮件通知:
/ Disable auto-update emails.
add_filter( 'auto_core_update_send_email', '__return_false' );

// Disable auto-update emails for plugins.
add_filter( 'auto_plugin_update_send_email', '__return_false' );

// Disable auto-update emails for themes.
add_filter( 'auto_theme_update_send_email', '__return_false' );
有没有想过一种更简单的方法来快速复制帖子的所有内容进行编辑,而无需触碰已发布的帖子?
以下代码片段将添加一个选项,以轻松复制包含其所有内容的帖子:
// Add duplicate button to post/page list of actions.
add_filter( 'post_row_actions', 'wpcode_snippet_duplicate_post_link', 10, 2 );
add_filter( 'page_row_actions', 'wpcode_snippet_duplicate_post_link', 10, 2 );

// Let's make sure the function doesn't already exist.
if ( ! function_exists( 'wpcode_snippet_duplicate_post_link' ) ) {
    /**
     * @param array   $actions The actions added as links to the admin.
     * @param WP_Post $post The post object.
     *
     * @return array
     */
    function wpcode_snippet_duplicate_post_link( $actions, $post ) {

        // Don't add action if the current user can't create posts of this post type.
        $post_type_object = get_post_type_object( $post->post_type );

        if ( null === $post_type_object || ! current_user_can( $post_type_object->cap->create_posts ) ) {
            return $actions;
        }


        $url = wp_nonce_url(
            add_query_arg(
                array(
                    'action'  => 'wpcode_snippet_duplicate_post',
                    'post_id' => $post->ID,
                ),
                'admin.php'
            ),
            'wpcode_duplicate_post_' . $post->ID,
            'wpcode_duplicate_nonce'
        );

        $actions['wpcode_duplicate'] = '<a href="' . $url . '" title="Duplicate item" rel="permalink">Duplicate</a>';

        return $actions;
    }
}

/**
 * Handle the custom action when clicking the button we added above.
 */
add_action( 'admin_action_wpcode_snippet_duplicate_post', function () {

    if ( empty( $_GET['post_id'] ) ) {
        wp_die( 'No post id set for the duplicate action.' );
    }

    $post_id = absint( $_GET['post_id'] );

    // Check the nonce specific to the post we are duplicating.
    if ( ! isset( $_GET['wpcode_duplicate_nonce'] ) || ! wp_verify_nonce( $_GET['wpcode_duplicate_nonce'], 'wpcode_duplicate_post_' . $post_id ) ) {
        // Display a message if the nonce is invalid, may it expired.
        wp_die( 'The link you followed has expired, please try again.' );
    }

    // Load the post we want to duplicate.
    $post = get_post( $post_id );

    // Create a new post data array from the post loaded.
    if ( $post ) {
        $current_user = wp_get_current_user();
        $new_post     = array(
            'comment_status' => $post->comment_status,
            'menu_order'     => $post->menu_order,
            'ping_status'    => $post->ping_status,
            'post_author'    => $current_user->ID,
            'post_content'   => $post->post_content,
            'post_excerpt'   => $post->post_excerpt,
            'post_name'      => $post->post_name,
            'post_parent'    => $post->post_parent,
            'post_password'  => $post->post_password,
            'post_status'    => 'draft',
            'post_title'     => $post->post_title . ' (copy)',// Add "(copy)" to the title.
            'post_type'      => $post->post_type,
            'to_ping'        => $post->to_ping,
        );
        // Create the new post
        $duplicate_id = wp_insert_post( $new_post );
        // Copy the taxonomy terms.
        $taxonomies = get_object_taxonomies( get_post_type( $post ) );
        if ( $taxonomies ) {
            foreach ( $taxonomies as $taxonomy ) {
                $post_terms = wp_get_object_terms( $post_id, $taxonomy, array( 'fields' => 'slugs' ) );
                wp_set_object_terms( $duplicate_id, $post_terms, $taxonomy );
            }
        }
        // Copy all the custom fields.
        $post_meta = get_post_meta( $post_id );
        if ( $post_meta ) {

            foreach ( $post_meta as $meta_key => $meta_values ) {
                if ( '_wp_old_slug' === $meta_key ) { // skip old slug.
                    continue;
                }
                foreach ( $meta_values as $meta_value ) {
                    add_post_meta( $duplicate_id, $meta_key, $meta_value );
                }
            }
        }

        // Redirect to edit the new post.
        wp_safe_redirect(
            add_query_arg(
                array(
                    'action' => 'edit',
                    'post'   => $duplicate_id
                ),
                admin_url( 'post.php' )
            )
        );
        exit;
    } else {
        wp_die( 'Error loading post for duplication, please try again.' );
    }
} );
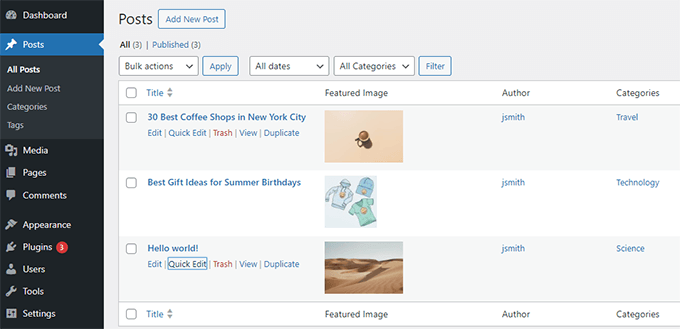
添加代码后,转到Posts » All Posts屏幕,然后将鼠标悬停在帖子标题上。
您会在选项下注意到一个新的 'Duplicate' 链接。
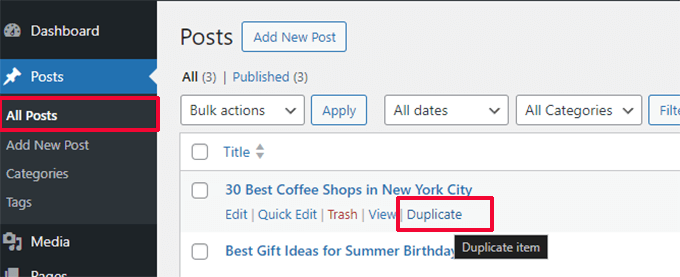
单击该链接将创建该帖子及其所有内容的副本。然后,您可以处理该草稿。
完成后,您可以将更改复制并粘贴到原始发布的帖子中,然后删除副本。
欢迎面板显示在 WordPress 管理仪表板中。通过单击“屏幕选项”按钮,可以轻松关闭或隐藏它。
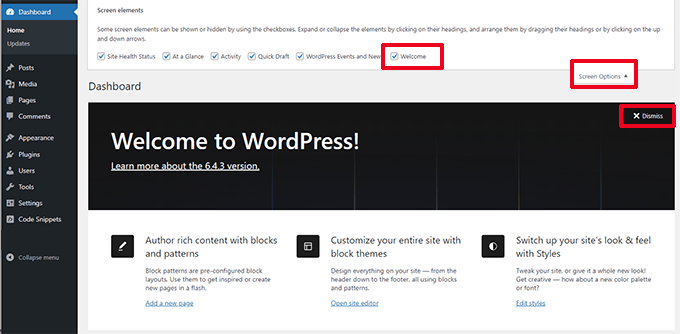
但是,如果您正在努力为用户提供更清晰的仪表板体验,则可能需要永久隐藏它。
添加以下代码以对您网站上的所有用户禁用它:
add_action(
    'admin_init',
    function () {
        remove_action( 'welcome_panel', 'wp_welcome_panel' );
    }
);
默认情况下,WordPress 仅在您查看网站或编辑文章或页面时显示特色图片。
以下代码将在Posts » All Posts屏幕中为特色图片添加一个新列:
add_filter( 'manage_posts_columns', function ( $columns ) {
    // You can change this to any other position by changing 'title' to the name of the column you want to put it after.
    $move_after     = 'title';
    $move_after_key = array_search( $move_after, array_keys( $columns ), true );

    $first_columns = array_slice( $columns, 0, $move_after_key + 1 );
    $last_columns  = array_slice( $columns, $move_after_key + 1 );

    return array_merge(
        $first_columns,
        array(
            'featured_image' => __( 'Featured Image' ),
        ),
        $last_columns
    );
} );

add_action( 'manage_posts_custom_column', function ( $column ) {
    if ( 'featured_image' === $column ) {
        the_post_thumbnail( array( 300, 80 ) );
    }
} );
这是添加代码后的样子。
一些 WordPress 网站可能需要用户注册一个帐户。例如,WordPress 会员网站或电子商务商店。
大多数此类插件会阻止这些用户访问管理区域。但是,如果您不使用此类插件,则可以添加以下代码来阻止除管理员以外的所有用户访问管理区域:
add_action( 'admin_init', function() {
    if ( ! current_user_can( 'administrator' ) ) {
       wp_redirect( home_url() );
       exit;
    }
} );
具有其他用户角色的用户仍然可以登录他们的账户,但登录后,他们将被重定向到主页。
我们希望本文能帮助您学习一些 WordPress 中 functions.php 文件的新有用技巧。

WordPress日记主要承接WordPress主题定制开发、PSD转WordPress、WordPress仿站以及以WordPress为管理后端的小程序、APP,我们一直秉持“做一个项目,交一个朋友”的理念,希望您是我们下一个朋友。如果您有WordPress主题开发需求,可随时联系QQ:919985494 微信:18539976310